I wanted to try and start this project about a year ago and I finally made myself this week start to compile all of my hardware that I have been salvaging, hoarding, finding, purchasing and saving. I have been looking through my Make Magazine 3 D printer edition and seeing how others are making professional printers and realizing i can make one myself. ( http://makezine.com/comparison/3dprinters/ ) This guide shows the quality, accuracy, cost, print size, etc… which provides the basic 3 D printer purchaser a way to find the right choice.
A 3D printer is something I have been thinking would be good for all my other electronic projects, to build housing, mounting hardware, special mechanical assemblies… I think it will also be good to learn the electronics and hardware behind the new products that are flooding the market… my print area will be approximately 8 inches by 8 inches by 10 inches… not to bad for a first 3D printer and for the size a commercial printer would be in the $1K to the $1.5K range. My cost so far… about 40 bucks! I bought the stepper motors used and they are capable of a half step (around 0.9 degree) SO… 400 HALF STEPS would be one 360 revolution on the shaft.
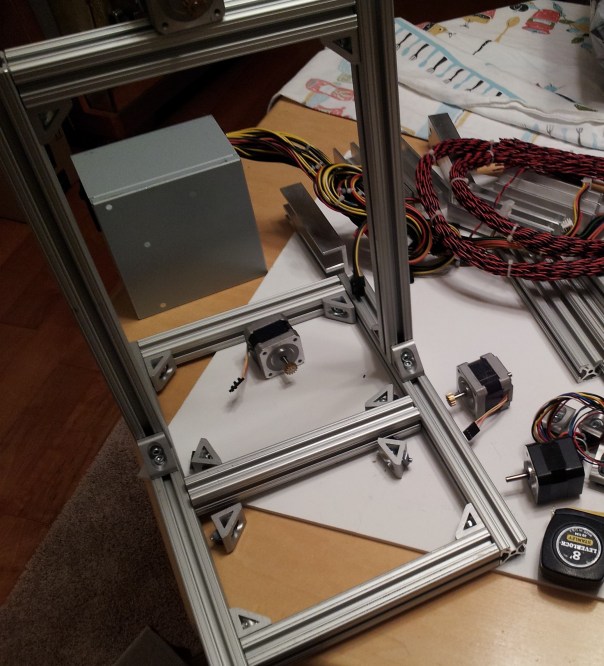
Below is the frame made our of 1.5 inch 80/20 stock aluminium, saved from a dumpster during a cleaning at MSI, a small micro satellite company that was purchased by SNC during my time in Littleton, Co. I saved roughly $80.00 but was limited to the size of the pre-cut stock for my frame size… I can always increase the print size if i want to buy larger 80/20 stock… but for now the print size I have will work great .
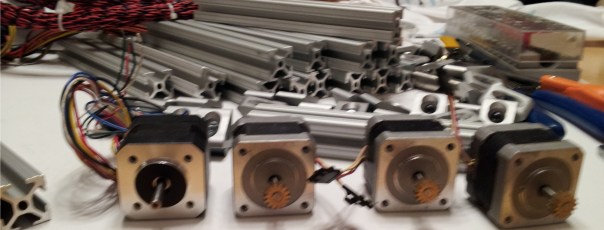
Below are the used, but good stepper motors I bought a while back in Colorado Springs at a little electronics shop that sells dismantled electronics.
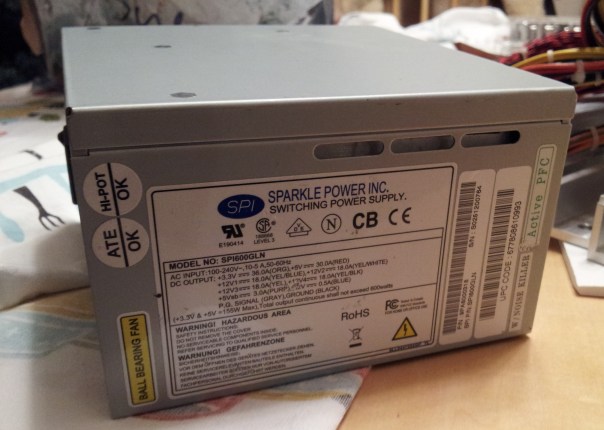
I even was able to get the power supply for free… just a general power supply out of a desk top PC… it is nice because the voltages and current supplied will be more than enough for the heat plate, spool motor, stepper motors for each axis and to power the electronics.
+3.3 Volts DC at 36 AMPS!
+5 Volts DC at 30 AMPS!
+12 Volts DC at 18 AMPS times 3!
Next up, wiring diagrams and electronics… I want to pre-route the power wires, micro switches and stepper controllers to see what size my support housing and clearance for the motors, switches, and threaded rod needs to be.
After that… mechanical linkage, thread rod, mounting the steppers.
As I work on my printer I will be sure to capture more photos, provide electronics and wiring diagrams and hopefully by summer be printing for some cool Halloween stuff or a small something to send to my friends and family for holiday!
Photo courtesy of :

Sweet! I’d love to do this. While you’re building, keep in my versatility! For instance, you could also use this as a 3 axis CNC machine (even with a little Dremel).
I’ve been thinking about a similar project for a laser (from retired DVD burner) engraver for wood burning, but cost of ball screws, etc have kept me at bay. Keep us updated as I’d love to see how this turns out.
I will definitely keep the blog updated… should be fun to see the progress… I was thinking that if I attached a Dremel I might be able to do some subtractive manufacturing! 🙂
I am also going to try and put a BOM and cost together after I get it all together… like I said in the text, right no I am doing it all on the cheep and hope to keep cost way low! Thanks for your comments!