Tag Archives: Crafts

Halloween Baby Doll – “Day Of the Dead”

Every year I have created at least one new Halloween baby doll for my collection. So, last  year I did a Day of the Dead baby doll with eyes that roll back open when the doll is sat upright, movable head, and its very own festive custom paint.

I have done some pretty cool baby dolls for Halloween, but to me this one doll really is the coolest and, at the same time, the creepiest and most fun to create.  I find my dolls at the local thrift stores taking care to find the ones with all plastic bodies, eyes that roll (and for my zombie doll a few years back, the tube that would allow me to make blood and green stuff come out of the mouth, depending on what I filled the squeezable holding bladder) and any other feature I might want to turn into a special effect.

Here is some other dolls:

Zombie baby!
Zombie baby!
Skeleton and Baby Dracula!
Finiish Doll
Pumpkin head baby Doll!

Some commonly used items for this type of project:

Sharp knife, hot glue gun, spray paint, acrylic paint, paint brush, scissors, CelluClay (a

Papier-mâché-type product sold at craft stores), aluminum foil, fabric and a plastic baby doll.

A few items used to make a Halloween Baby Doll, not all items pictured, so please see text!

After taking the clothes off (and tossing them in the washing machine for re-use on other projects) and cleaning the plastic body of the doll with water and a few drop of bleach, I can guarantee that my doll is clean and ready for me to work on.  Also it removes crayon marks, dirt, juice or anything else the doll was pulled through in its previous life.  A clean canvas is key to the creative flow. A light sanding will also allow paint to stick better, so you might want to rough up the plastic body a bit.

I typically pull the head off, cut out the eyes with a sharp razor, and start my transfer of the eyes back into the plastic skull.  Cut a hole big enough for the rolley eyes and hot glue them into the skull.  On this doll, I also cut the hands and feet off to allow plastic skeleton hands to be hot glued on in their place.

20121003_172301

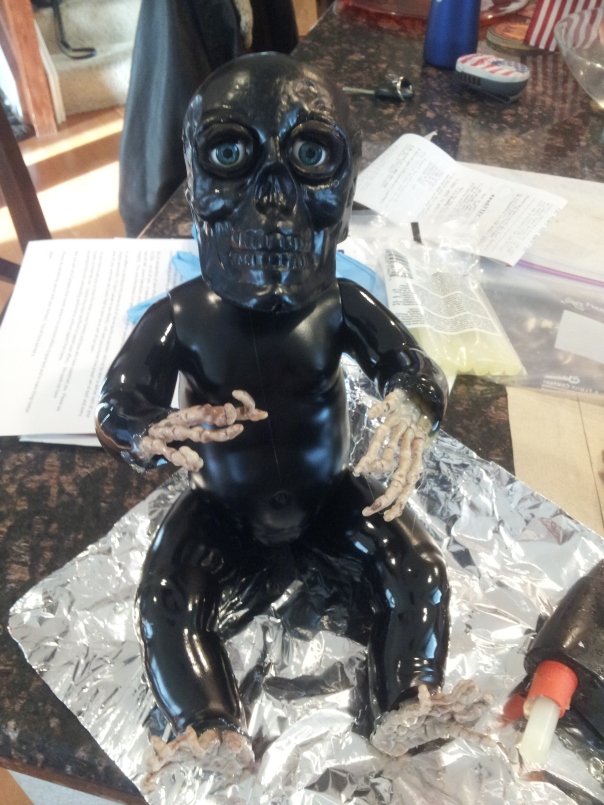
Next is the paint! I use acrylic paint with a base coat of flat black spray paint.
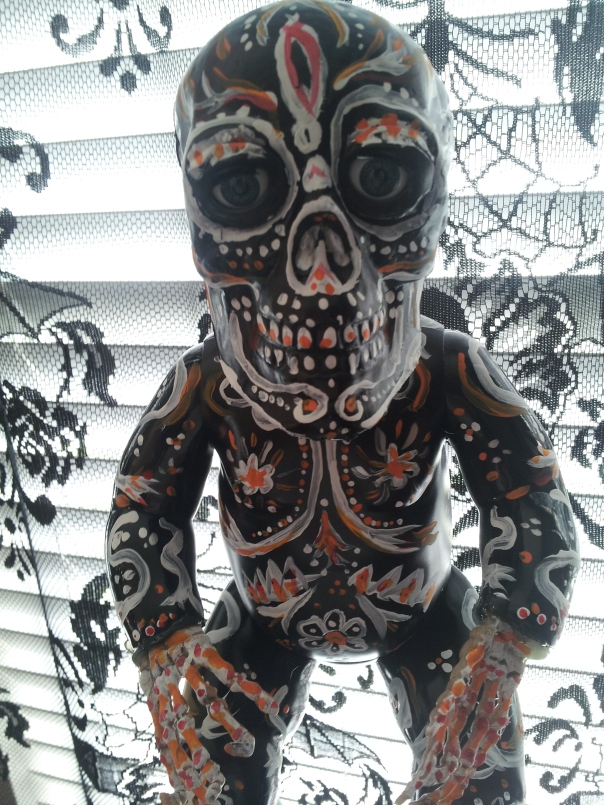
20121007_152409
Custom Paint!
He is ready for the kiddies . . . Halloween . . . and to be on display for whomever comes during the month of October!
I think the creepier the better. Have to keep those Trick-or-Treaters on their toes!  As they get close, you can see their faces turn from ones of sugar-filled happiness to ones of horror and disgust!

Pumpkin Head Baby Doll!

Every year I have create at least one new Halloween Baby doll for my collection… but now it is time to share my creations… This year I did a Pumpkin Head baby doll with the eyes that roll back open when the doll is sat upright, movable head,  and its very own custom fall robe.

I have done some pretty cute ones for Halloween, but to me this one doll really is the cutest, littlest and (at the same time the creepiest) most fun to work on.  I find my dolls at the local thrift stores taking care to find the ones with all plastic bodies, eyes that roll (and for my zombie doll a few years back, the tube that would allow me to make blood and green stuff come out the mouth, depending on what I filled the squeezable holding bladder) and any other feature I might want to turn into a special effect.

Some commonly used items for this type of project:

Sharp knife, hot glue gun, paint, paint brush, scissors, Papier-mâché, spray paint, tin foil, fabric and a plastic baby doll.

A few items used to make a Halloween Baby Doll, not all items pictured... so please see text!
A few items used to make a Halloween Baby Doll, not all items pictured… so please see text!

Taking the clothes off (tossing them in the wash machine for recycle on other projects) and cleaning the plastic body of the doll with water with a few drop of bleach… I can guarantee my doll is clean and will not get me sick with some kiddie germ I have not seen in 30 years.  Also it removes crayon marks, dirt, juice or anything else the doll was pulled through in it’s younger life.  A clean canvas is key to the creative flow.

Drying head and clean doll body.

I typically pull the head off, cut out the eyes with a sharp razor, and start my Papier-mâché using the head as a base and work slowly to build it up.   Setting the eyes back into the appropriate place (or not, DEPENDING on if you want A HUNCHBACK baby doll) and letting the molded wet paper dry. Once the paper is semi dry it is time to add the scars, wrinkles or cut in the nose and mouth.  Add teeth (plastic fork tines), sew a robe for the baby doll body and paint!

I think the creepier the better… keep those Trick-o-Treaters on their toes! As they get close and see their faces turn from sugar filled happiness into one of horror and disgust!

Finiish Doll
He is ready for the kiddies… Halloween … and to be on display for who ever comes during the month of October!

Tomorrow… a candle holder that will be the talk of your Halloween Party!