Category Archives: Halloween

Bass Tube DIY

For a long time I have been very interested in building speakers… for home, for stage, for car and for outdoors… I have tried many different styles and types of enclosures… but I came home from work and looking around in my garage I decided to build a very quick bass tube out of free junk I have collected. i have always wanted to try this type of tube style with the extra added horn/port… and i figured I would capture some photos along the way to show the build.

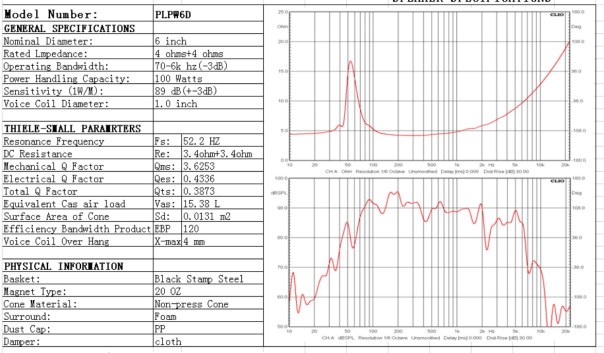
I did some very basic calculations to find the perfect length and using the data sheet for the speaker (a Pyle Power Series Dual Voice-Coil 4-Ohm 6.5-inch 600-Watt Subwoofer) I optimized the volume for the 40 to 50 Hz frequency. Now the spec for the speakers says the range is 38 to 70 Hz, but the port will be tuned for 53 Hz.

woofer spec

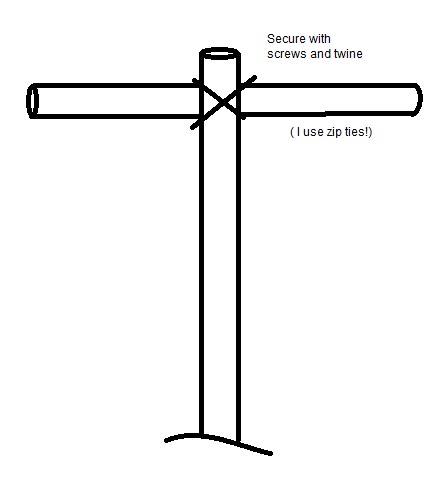
Some plastic tube and a cardboard tube (all free) will become the body, some scrap particle board will hold the speaker at one end and the other end the speaker connection. Some blanket matting will become the interior tube baffle or damping material, and some wire will be run the length to ensure I have good connections to the speaker (once it arrives in the mail).

IMG_0171

Plastic tube is cut to the correct length which is based on the volume needed for a ported enclosure.. in my case it was 27 inches.

IMG_0169

Here is the peices cut… the ends have a flat edge to keep the speaker from rolling around.

IMG_0183IMG_0185

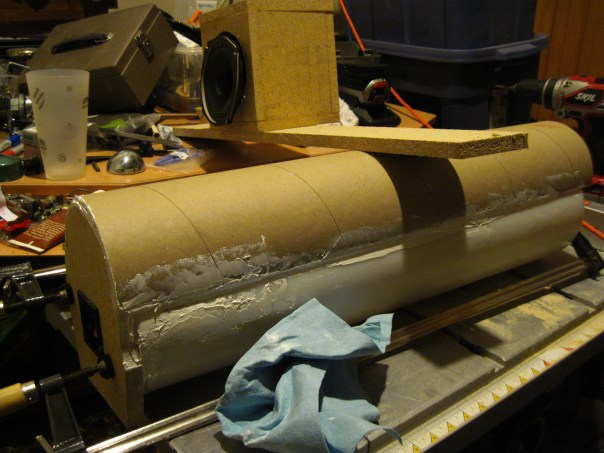
Some glued in matting… a dry assembly and now to put it all together. (Right photo: Looking down the tube cut in half to make the port.)

IMG_0180

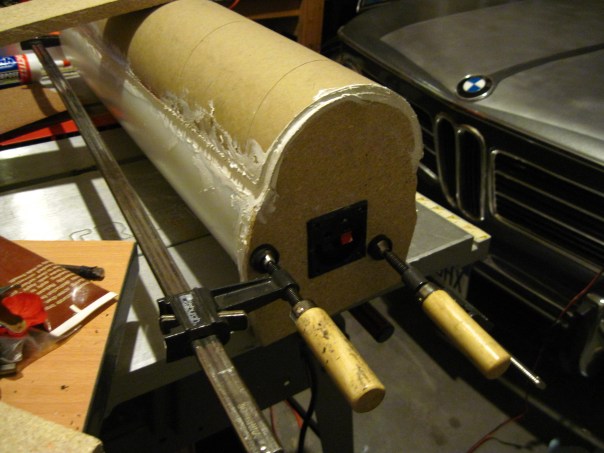
I just used some construction adhesive to join everything… since it is ported I am thinking the pressure will be minimal and not fatigue all of the parts connection points. I might run a few drywall screws in key locations just to be safe before I cover the tube.  HEY! There is the Stuka! My 1968 BMW 2002 in the garage for the winter taking a nap and on the trickle charger!

IMG_0178

For now… I will let it dry and wait for the speaker to arrive… once I get the woofer I will finish the build, conduct a measurement recording of a sweep frequency of 20 Hz to 70Hz and plot the data for a review and blog post. I hope to have it done soon!


3D Printer (Do it myself)

I wanted to try and start this project about a year ago and I finally made myself this week start to compile all of my hardware that I have been salvaging, hoarding, finding, purchasing and saving. I have been looking through my Make Magazine 3 D printer edition and seeing how others are making professional printers and realizing i can make one myself.  ( http://makezine.com/comparison/3dprinters/ )  This guide shows the quality, accuracy, cost, print size, etc… which provides the basic 3 D printer purchaser a way to find the right choice.

A 3D printer is something I have been thinking would be good for all my other electronic projects, to build housing, mounting hardware, special mechanical assemblies… I think it will also be good to learn the electronics and hardware behind the new products that are flooding the market… my print area will be approximately 8 inches by 8 inches by 10 inches… not to bad for a first 3D printer and for the size a commercial printer would be in the $1K to the $1.5K range.  My cost so far… about 40 bucks! I bought the stepper motors used and they are capable of a half step (around 0.9 degree) SO… 400 HALF STEPS would be one 360 revolution on the shaft.

Below is the frame made our of 1.5 inch 80/20 stock aluminium, saved from a dumpster during a cleaning at MSI, a small micro satellite company that was purchased by SNC during my time in Littleton, Co.  I saved roughly $80.00 but was limited to the size of the pre-cut stock for my frame size… I can always increase the print size if i want to buy larger 80/20 stock… but for now the print size I have will work great .

3d printer_1

Below are the used, but good stepper motors I bought a while back in Colorado Springs at a little electronics shop that sells dismantled electronics.

3d printer_2 motors

I even was able to get the power supply for free… just a general power supply out of a desk top PC… it is nice because the voltages and current supplied will be more than enough for the heat plate, spool motor, stepper motors for each axis and to power the electronics.

+3.3 Volts DC at 36 AMPS!

+5 Volts DC at 30 AMPS!

+12 Volts DC at 18 AMPS times 3!

3d printer_power supply

Next up, wiring diagrams and electronics… I want to pre-route the power wires, micro switches and stepper controllers to see what size my support housing and clearance for the motors, switches, and threaded rod needs to be.

After that… mechanical linkage, thread rod, mounting the steppers.

As I work on my printer I will be sure to capture more photos, provide electronics and wiring diagrams and hopefully by summer be printing for some cool Halloween stuff or a small something to send to my friends and family for holiday!

random-3d-printed-objects-hand-skull-c

Photo courtesy of Bulent Yusuf:

https://all3dp.com/best-sites-free-stl-files-3d-printing/

Time for some Halloween!

Once again it is time for some halloween projects to get ready for October… and it is my favorite time of the year. Fall, leaves in full color, the crisp night air, and Of course Halloween!

Just as I have done in the past few years, I am going to make some new creations for my yard and for the tricker-treaters… A new idea for a more automated talking skull are in the works and this year, (As I am starting earlier), a new scarecrow mask for myself and maybe a small more relaxed Halloween party… I was thinking a sit down dinner with a mystery twist…. but who knows, as I always go big and never have enough time.

I also saw some really cool figures to put into the lawn and I could light the with a solar spot light to creep the kiddies out of my yard.

I will try and photo my progress and provide some instruction, code, electronics, etc.  on all of my projects… My goal is to use the items I already have and make them better, or use stuff I have on hand to keep it cheap and simple.

I look forward each year to posting these crazy ideas and I hope you enjoy… as for now, you can check out my previous posts on Halloween…

Haunt you later!

Halloween Party Time!

https://wdavisonjr.wordpress.com/2013/10/28/halloween-party-time/

Baby Doll “Day of the Dead”

https://wdavisonjr.wordpress.com/2013/10/24/halloween-baby-doll-day-of-the-dead/

Halloween Window Shade

IMG_1742

https://wdavisonjr.wordpress.com/2013/10/16/halloween-window-shadow/

Halloween Vintage Blow molds!

IMG_1741

https://wdavisonjr.wordpress.com/2013/10/15/halloween-blow-molds/

Scarecrow for your front yard!

20130929_155848

https://wdavisonjr.wordpress.com/2013/10/11/scarecrows/

Halloween is almost here!

It is time for me to put away the summer decor and turn to my basement for the ghoulish decorations and visual treats of Halloween… I am always so excited to make and create the next scary display for the kids on Halloween and my friends for my party.

I have almost finished my Skeleton with cauldron scene… he will talk and sounds of fire and bubbles from the cauldron with come from the speaker built under the pot… flickering lights will give the visual of a smoldering fire and fog pumped into the cauldron will provide the spooky feel…

Frame and staging for more work on the talking skeleton.

In addition to the new movement style skeleton decoration for the porch I always do one new baby doll and this one goes a bit over board… but it turned out great! Scary Great!

A clown baby doll… I sewed the robe and painted like crazy one night in early September… really look at the fabric it is really cute and has a boy dressed as a clown!

Halloween Baby doll for 2014

As anyone knows who has seen my blog site i love halloween and you can be sure i will post something new i am working on each day starting on October 1st!  As for now you will have to wait and look at the past blog posts:

Halloween Party Time!

https://wdavisonjr.wordpress.com/2013/10/28/halloween-party-time/

Baby Doll “Day of the Dead”

https://wdavisonjr.wordpress.com/2013/10/24/halloween-baby-doll-day-of-the-dead/

Halloween Window Shade

IMG_1742

https://wdavisonjr.wordpress.com/2013/10/16/halloween-window-shadow/

Halloween Vintage Blow molds!

IMG_1741

https://wdavisonjr.wordpress.com/2013/10/15/halloween-blow-molds/

Scarecrow for your front yard!

20130929_155848

https://wdavisonjr.wordpress.com/2013/10/11/scarecrows/

Halloween Party Invite ideas!

Added info and made the size a postcard.

https://wdavisonjr.wordpress.com/2013/10/01/halloween-is-in-30-days-party-invites-decorations-and-more-all-in-30-days/

Halloween Baby Doll – “Day Of the Dead”

Every year I have created at least one new Halloween baby doll for my collection. So, last  year I did a Day of the Dead baby doll with eyes that roll back open when the doll is sat upright, movable head, and its very own festive custom paint.

I have done some pretty cool baby dolls for Halloween, but to me this one doll really is the coolest and, at the same time, the creepiest and most fun to create.  I find my dolls at the local thrift stores taking care to find the ones with all plastic bodies, eyes that roll (and for my zombie doll a few years back, the tube that would allow me to make blood and green stuff come out of the mouth, depending on what I filled the squeezable holding bladder) and any other feature I might want to turn into a special effect.

Here is some other dolls:

Zombie baby!
Zombie baby!
Skeleton and Baby Dracula!
Finiish Doll
Pumpkin head baby Doll!

Some commonly used items for this type of project:

Sharp knife, hot glue gun, spray paint, acrylic paint, paint brush, scissors, CelluClay (a

Papier-mâché-type product sold at craft stores), aluminum foil, fabric and a plastic baby doll.

A few items used to make a Halloween Baby Doll, not all items pictured, so please see text!

After taking the clothes off (and tossing them in the washing machine for re-use on other projects) and cleaning the plastic body of the doll with water and a few drop of bleach, I can guarantee that my doll is clean and ready for me to work on.  Also it removes crayon marks, dirt, juice or anything else the doll was pulled through in its previous life.  A clean canvas is key to the creative flow. A light sanding will also allow paint to stick better, so you might want to rough up the plastic body a bit.

I typically pull the head off, cut out the eyes with a sharp razor, and start my transfer of the eyes back into the plastic skull.  Cut a hole big enough for the rolley eyes and hot glue them into the skull.  On this doll, I also cut the hands and feet off to allow plastic skeleton hands to be hot glued on in their place.

20121003_172301

Next is the paint! I use acrylic paint with a base coat of flat black spray paint.

20121007_152409
Custom Paint!
He is ready for the kiddies . . . Halloween . . . and to be on display for whomever comes during the month of October!
I think the creepier the better. Have to keep those Trick-or-Treaters on their toes!  As they get close, you can see their faces turn from ones of sugar-filled happiness to ones of horror and disgust!

Halloween Window Shadow

I know this idea has been done a million times, but now I am seeing people all over “SPEND MONEY” on this easy to do, fun to MAKE and super cheep project!

Be creative and do your own CUSTOM Halloween Decoration!

Come on MAN! get it together and have some fun while decorating your home.   You say you are too busy… then get up, turn off the TV and go get some very simple items and tools.

And MAKE your own custom Halloween Window Shadow

IMG_1742
My crazy pumpkin in the window from outside.

A cardboard box, a box cutter/ razor, colored tissue paper, clear packing tape, and an area that you can cut a cardboard box without hurting anything like a wood floor or carpet or a table top (not that I did that, just a warning). If you a young person, get an adult, if you are a young person at heart, grab your inner adult to supervise yourself.

Decide what shadow you want to do. I did a pumpkin face, a jolly roger pirate flag and a snow flake for the “other” holiday season.

Next is a quick  series of simple pictures showing the progress of Making your own.

shadow 2
Put together several pieces of cardboard that can be taped together and fill the window you want the Shadow in.shadow 3

Put together several pieces of cardboard that can be taped together and fill the window you want the Shadow in.

shadow 4
Draw the pattern you want the light to shine through.
shadow 5
Cut out the negative. Be carefull… razors are sharp!
shadow 6
On the back side of the cardboard (the side that is away from the outside of the window view) tape or glue the tissue paper to cover all the holes in your pattern.

Mine looked like this…

IMG_1745

Turn on the light to the room and go outside when its dark… don’t get frightened when you see your Halloween surprise!

SPOOKY!
SPOOKY!

Have fun and Make IT!

Halloween Blow molds!

Every Halloween I love putting out my collection of the old Empire blow mold that reminds me of my childhood trick-or-treating days of old. Great fun and make the porch glow, plus adds safe lighting for the steps!

I just wanted to post my collection! So thanks for looking!

IMG_1737
Ghost with pumpkin and black cat on the front porch.

IMG_1738

IMG_1739
Modified with a metal base and florescent light buld.
IMG_1741
This one is really rare and I am trying to find more information on this one… not empire.

UPDATE!  the one above “Witch on a broom” is a Sun Hill product, made in the USA! and the ones I am seeing on auction sites are approximately 40 to 60 USD!

empire
My new ones!

Scarecrows!

If you have a murder of crows invading your front yard or you want to add a bit of fright for the kiddies on Halloween night, then the perfect Scarecrow display will do the trick, for scaring those treaters.

A simple poles with cross beam design provides the support, clothes from a thrift store or your old jeans that don’t fit can be the start of a very fun and cheep display. I stuff my old clothes with newspaper and take safety pins (around the belt line) to secure the pants and the shirt to keep the pants on and the shirt from letting out the newspaper stuffing.

Wood poles and twine or zip ties and a screw to secure.
Shirt on pole
Put the shirt on the pole, with the arms of the shirt around the cross dowel.
pants attatched
The grey lines are to represent safety pins to secure the pants to the shirt. Remember…the pole will need a place in back of the pants to come out behind the pants or cut a hole or run it all the way down the pant leg on one side.

The stuffing is up to you… how much or how little is a way to make your scarecrow who you want it to be.

I use a support that anchors the base to a fence and a spike that is sunk into the ground for added stability.

20130929_155848
Finished Scarecrow with fence.
Halloween Night!
Halloween Night!

Add a pumpkin head, and some lighting, a hat or even a few strategically placed black birds or an owl and you are all set!

Spooky Candle Holder in an Hour!

Thrift stores have it all… if you are looking for something and it doesn’t have to be new, and you can take your time to find it… then for pennies on the dollar you can find treasures! One such treasure… a brass candle holder for three candles.

Now I wanted to make this candle holder for my Halloween party covered in spider webs, dripping blood and super creepy… I got started and realized it didn’t need to have an “over the top” covered in craziness… a simple design made it classy yet, when lit, it was an eerie sight… you judge.

Puts out good light, just warn guests to remember their surroundings and Hair and Costumes are flammable!

I started by painting the brass flat black, added with a glue gun small skeleton hands I found at the hobby and craft store, added a painted plastic skull to the top and finished with 3 (Halved) blood dripping candles.  The beads were an after thought and not permanent to the decoration but added for the color to tie in some other decorations.

20120930_132637

A simple design and a fast build (less than 1 hour total) made for a nice addition to the decorations for the Halloween party.  I ended up finding the same candle holder a few months later, and will make a twin for the other side of my sliding glass window.

Pumpkin Head Baby Doll!

Every year I have create at least one new Halloween Baby doll for my collection… but now it is time to share my creations… This year I did a Pumpkin Head baby doll with the eyes that roll back open when the doll is sat upright, movable head,  and its very own custom fall robe.

I have done some pretty cute ones for Halloween, but to me this one doll really is the cutest, littlest and (at the same time the creepiest) most fun to work on.  I find my dolls at the local thrift stores taking care to find the ones with all plastic bodies, eyes that roll (and for my zombie doll a few years back, the tube that would allow me to make blood and green stuff come out the mouth, depending on what I filled the squeezable holding bladder) and any other feature I might want to turn into a special effect.

Some commonly used items for this type of project:

Sharp knife, hot glue gun, paint, paint brush, scissors, Papier-mâché, spray paint, tin foil, fabric and a plastic baby doll.

A few items used to make a Halloween Baby Doll, not all items pictured... so please see text!
A few items used to make a Halloween Baby Doll, not all items pictured… so please see text!

Taking the clothes off (tossing them in the wash machine for recycle on other projects) and cleaning the plastic body of the doll with water with a few drop of bleach… I can guarantee my doll is clean and will not get me sick with some kiddie germ I have not seen in 30 years.  Also it removes crayon marks, dirt, juice or anything else the doll was pulled through in it’s younger life.  A clean canvas is key to the creative flow.

Drying head and clean doll body.

I typically pull the head off, cut out the eyes with a sharp razor, and start my Papier-mâché using the head as a base and work slowly to build it up.   Setting the eyes back into the appropriate place (or not, DEPENDING on if you want A HUNCHBACK baby doll) and letting the molded wet paper dry. Once the paper is semi dry it is time to add the scars, wrinkles or cut in the nose and mouth.  Add teeth (plastic fork tines), sew a robe for the baby doll body and paint!

I think the creepier the better… keep those Trick-o-Treaters on their toes! As they get close and see their faces turn from sugar filled happiness into one of horror and disgust!

Finiish Doll
He is ready for the kiddies… Halloween … and to be on display for who ever comes during the month of October!

Tomorrow… a candle holder that will be the talk of your Halloween Party!